Monday, October 1, 2012

Red Chippy Box

During this summer's drought, I only watered when absolutely necessary, so the garden is looking pretty shabby.  This winter I'm going to plan for an overhaul of half of the backyard next spring.

In the meantime, I've been slowing cleaning out the garden, and I decided this planter box has seen its better days.


I built it about 11 years ago out of scraps from a deck and fence project.  I really didn't have any sort of plan when I built it, so I'm pretty amazed it held together for so long.

I unscrewed the side panels, trimmed the weathered ends and built a little box.  On a whim, I added the little feet.  Aren't they cute?

 
I used a palm sander and a Dremel to wear down all the edges.  Originally, I was going to leave it natural, but the wood was so bowed from being outside, I had to use a lot of wood putty to fill the joints.  Now, I'm so glad I painted it.
 
 
It took the better part of an afternoon to get the effect I wanted.  It was worth the time spent!
 

So how did I get the look?  Chalk paint?  Milk paint?

Nope.  It's all just typical craft store stuff!


Start with a brown acrylic craft paint for the base coat.  Follow with black acrylic craft paint for the second coat.  I think starting with brown keeps the black from seeming too stark when the layers are sanded away.

Next, apply one coat of Weathered Wood Crackle Medium (follow the directions on the package).  Top coat of Cadmium Red acrylic craft paint.

Sand, sand, sand.  Complete with Minwax Paste Finishing Wax.


I can't describe how amazingly soft the wood feels.  The wax really makes the box feel old.

Then again, I used 11+ year old wood to build it.  Let's see those feet one more time.


I'm linking up...

Tuesday, September 11, 2012

Mary Carol Garrity Fall Home Tour, Part 2


Welcome back for part two of last weekend's fall tour of Mary Carol Garrity's beautiful home in Atchison, Kansas.  You can see part 1 here, which featured the interior.

Today, we're going to visit the garden, beginning with the screened in porch.


I get so overwhelmed in some of these spaces, especially when I'm trying to take it all in while surrounded by dozens of chatty women.  I overlooked this little fellow until I was reviewing the photos after I came home.  Look at that little pumpkin he's holding.  So sweet!


The southeast exposure is probably what allows her to use such lovely pieces in an outdoor area, especially in stormy Kansas. Mary Carol mentioned that some storms rolled through during the open house on Friday afternoon, and the tornado sirens were activated. She recalled the next day, "I have all these people in my house, and I don't want them to see my basement!"


While this lantern and the urn separately are lovely pieces, putting them together makes quite a statement. 


There's one of those orbs again.  I know I'm going to regret not buying one.


Many of the items she was featuring were already sold out by the time I arrived Saturday afternoon, but I did study this take on a baker's peel as a charger at Nell Hills.  This would be an easy DIY knock-off.


Another orb (sigh).  I looked at the birds at the store.  I really liked them.  A lot.  They were about $35 each, so they didn't come home with me.


However, if she was selling this wine-toting statue, he would have come home with me, regardless of the price!


Alas, he must be from her personal collection, not for sale in her stores.  Isn't he adorable?
 

Speaking of adorable, this little fellow is also precious.  I love how he seems to be studying something in the leaves.

One thing I really like about Mary Carol's style is how effortlessly she marries together current trends with the tried and true, like this wire lantern set on a very traditional iron birdbath. 


A closer look...


One comment I overhear from other lookie-loos is that Mary Carol's style can seem cluttered.  That's OK.  It's her home, and she's obviously comfortable in it.  Regardless, I think she sets a good example of how to let your home evolve, where to invest money in timeless pieces, and how to use today's decorating fads as fun, pretty accents.
 
If you pin, please be sure to give Mary Carol credit for her work.


Sunday, September 9, 2012

Mary Carol Garrity Fall Home Tour 2012, Part 1

The autumn-like weather yesterday was absolutely wonderful, perfect for driving to Atchison, Kansas, for the fall home tour of Mary Carol Garrity, founder of Nell Hills.  This tour featured only autumn decorating since there will be another open house in November for the holidays!  You can see the spring tour here and last year's autumn tour here, which also featured Christmas decor.


The stairs to her home were flanked by two large lanterns.  Notice the pumpkin inside perched on top of a small mercury glass pedestal.  Love that!

I'm always in awe of the architecture of her home.  Atchison is filled with historic homes and grand buildings, a lasting legacy of the city's prosperity during the overland trade period of the mid-1800s and early industrial era of 1870-1900.

 
Most of her fall decorating was the abundant use of floral stems, pumpkins, and pinecones.  Mary Carol said in the past she and her decorating team used pipe cleaners for constructing the displays, but now they use zip ties.
 
 
Mary Carol named a few trends for decorating this season, including mercury glass, and she said that "orbs are the new lanterns."  These orbs were flying out the door at her two shops, Nell Hills and Garrity's.
 
 
I couldn't decide how I felt about them.  I'll probably regret not picking up one.  Let's go inside!

All the sparkle wasn't limited to mercury glass.  Check out this huge silver bowl.  Besides the colors, I think I love decorating for autumn because it's so easy.  A good faux pumpkin can be prettier than the real thing.  Gourds last for weeks.  Twigs are free, and pinecones can be a one time investment (and good for Christmas decorating, too).

 
A small den is off the grand foyer.  Don't let this photo fool you.  It's a dark, masculine space, but I love all of rich textures.  Mary Carol almost always has a display on top of her cabinets, like this dough bowl overflowing with the colors of autumn.  By the time I find one of these at a price I'm willing to pay, the trend will be long gone.
 
 
In contrast to the den, the living room is filled with light.  Not much new here by way of comparison this fall, but I did admire the mantel.  Notice how the asymetrical display frames the artwork, the twigs wrapping around the image.  Gorgeous!
 
 
Let's check out the dining room, which always promises to be dramatic.
 
 
Remember the secret?  Zip ties!
 
 
Lots of mercury glass on the table.  I always see those over-sized martini glasses at hobby stores, and I think they look so tacky.  Here, they are actually pretty.
 
 
After all the grandeur of the exterior, the foyer, the living room, and dining room, I'm always happy to see the kitchen.
 
 
As in most historical homes, the kitchen is pretty darn small!  I happened to catch it when no one was in there so I could get a good picture.  Even though it's small, it is full of practical style.
 
 
And yes, those glass containers filled with dishwashing liquids aren't just for looks.  They appear to be used everyday.  Who wouldn't love to cook here?


Be sure to check back on Tuesday for the garden tour!
 
If you pin, please be sure to give Mary Carol credit for her work.


I'm linking up...


Monday, September 3, 2012

Another Fine Mess


As I left my studio this evening...


One project underway, one waiting in the wings.


I finished one stained project this weekend.

 
An old plate, which is my favorite paint palette. 
 

Spool of thread from sewing a button on in hurry Sunday morning. A pile of fabric that will some day become a quilt. Some day. Can of oops paint for the benches I rescued when a neighbor was putting them out for trash day. Three benches. One painted, so far.
 
Despite the mess, this is my happy place.

Monday, August 27, 2012

Pair of Pears

A couple of years ago, I started dabbling in painting.  I claim to be no artist.  While I took art classes when I was in school, they were usually for drawing or ceramics.  I am a 100% self-taught painter.


I like painting abstract landscapes.  And pears.  With a palate knife.  No brushes involved.  I painted the whole thing with this:


Why are pears such a common subject?  There must be something about those curves.

I used a 12 x 12 wrapped canvas, so I could have skipped the framing, but my decorating style is pretty traditional so a frame was more appropriate.  While I was pleased how this painting turned out, I didn't want to splurge on custom framing.

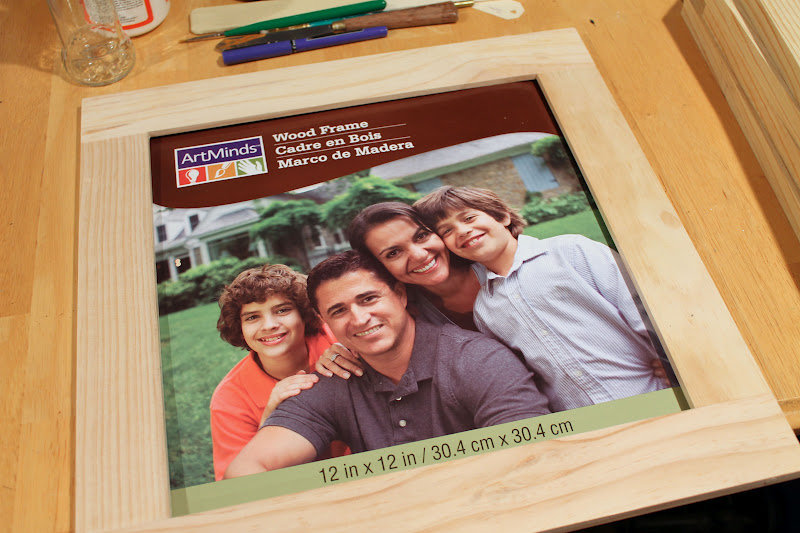
So I started with basic wood frame from Michaels (plus a 40% off coupon).


It's a shallow frame so the canvas would stick out the back, so I added some bulk on the backside with some 1x2 I had on hand.  I used wood glue and small brads to attach the four pieces to the main frame.


Next, a little sanding and a bit of wood putty to fill the gaps, followed by two coats of my favorite craft paint.


I had painted the hall to the garage red last year.  I love the color, but it's a little dark.  I love the way the green pears pop against the wall now.


I'm linking up...
 

Tuesday, August 21, 2012

Mini-Bar Knock-off

In my part of the country, finished basements are pretty typical.  Some are really tricked out with elaborate wet bars, and I really question how much use they get.

When I've toured Mary Carol Garrity's home, one of the things I've admired is her mini-bar which moves from room to room, depending on the season.  I've seen it set up in her foyer ready to serve guests at a holiday party or tucked aside in the living room.


While I try to keep the liquor put away, it always seems like the old stand-bys don't stay in the cabinet.  I had a spare corner in the dining room that would be perfect for a small cart or table, if I could find one.

I searched my favorite thrift stores and second-hand shops until I found this table at a local antique store.


Being a reproduction, not an actual antique, the price was right.  I didn't like the backing or the spindles, but they were easy to remove.  The shelves were wood veneer, but I figured it could strip it and restain it.

And that's where my troubles started.

First problem: The original stain was stubborn, especially on the legs.  The stripper was pretty ineffective, so I had to sand the majority of the legs.

Second problem:  I couldn't get the new stain to "take."  I wanted it to be a dark cherry color.  I applied one coat of Minwax Red Mahogany.  Then a second coat. Still too pale.  So I switched to Ebony.  (Thank goodness I had all this stain on hand already).  Closer, but not quite.  The grain was disappearing and it looked muddy.  At this point, I'm ready to ditch the stain and head for the spray paint.

Good thing I didn't give up.


How did I achieve that rich finish?  I wiped down the excess stain with mineral spirits and tried one more thing: a wash with burnt sienna acrylic craft paint with just a dab of black paint. Brushed it on a small section with a chip brush, then promptly wiped the excess.  Let it dry, then sealed with Minwax's Wipe-on Poly.

Perfect!


I know that distressed chalk paint is all the rage...to the point of being passé in my opinion.  Give me that subtle shading of stained wood any day.


Shhhh...the lamp came from our neighbor's trash.  Formerly shiny brass, I spray painted it ORB.  I think their daughter recognized it when I was painting it in our driveway.  Yes, that was a little embarrassing.  The lampshade was a ReStore find last week.

Cocktail, anyone?


And my most recent Nell Hill's purchases: This little fern plant and decanter.


For all the hours I spent trying to get the finish right, I'm so glad I didn't give up on it.


I'm linking up...
 

Saturday, August 11, 2012

Chaos

I dream of being featured in a craft magazine. Somehow, I don't think that's going to happen.


I've been working on a lot of small, diverse projects, which means the studio is a complete mess.


Try as I might, I can't seem to keep the table clear.  Receipts.  Fabric scraps. Embroidery floss. Paint.  Jars of Mod Podge.  More paint.  One finished project peeking out, waiting to be hung.


Fabric for a partially completed quilt. Burlap scraps.  Packaging tape.  Bits of ribbon.


Here is Where This Woman Creates.