Showing posts with label before and after. Show all posts

Friday, March 11, 2016

Poppies in Evening (a process)

This is one I'm having a hard time letting go. This was was really a labor of frustration with a happy ending.


Poppies in Evening
Acrylic on canvas board, 8 inches by 10 inches
Available for purchase here

I struggled with this painting. Initially, the poppies looked flat. There were hills and a stream that seemed awkward. The sunset was too pink. OK, do you want to see the wreck of the before?


My eyes are covered now. I can't look anymore. I was tempted to toss it out, but I'd invested so much material on it. With the palette knife, I applied big, bold patches of color.


Yes, that still looks nothing like the final results, but it gave me enough room for a do-over. Look closely, and you can see the shadows of the trees in the background, and the hint of the sun sinking into the horizon. The bunny slope of a hill and the clunky stream are gone. Let's take a look at the end results again for comparison.


My friends, there are A LOT of layers of paint on this one. But by the time I added the black outlines, I was sold that this is how it should be. Have a close up...


It's 100% palette knife work. All of the highlights were carefully scratched on with the tip of the knife. I love the results, and I feel like I'm starting to find my voice on canvas. I really hope this one finds a good home.


Wednesday, July 24, 2013

The Problem with Bay Windows

When we bought our house, one of the things that I really loved was the bay windows in the living room.  Fast-forward ten years later, and I ask myself, "What was I thinking?"

Yes, they provide a lot of light, but I've really struggled finding the right window treatments.  Here's the picture from the listing when we bought the house.  Check out that swag!  Huge floral print decked out in 1990s jewel tones!


Can you believe when we wrote the contract, I insisted on the owners leaving that valance?  Again, "What was I thinking?"

After a couple of years, they were looking faded and outdated, so I sold them on Craigslist and replaced them with a simpler set of three valances to coordinate with the new olive green walls.


Say it with me now: "What was I thinking?"  At the time, I thought it was an improvement, but Mr. Tallgrass said they looked "too whimsical."  The seed of doubt was now planted and growing like a weed.

(To my credit, the tutorial for making these valances is one of my all-time most viewed posts.)

After adding the overmantel in the living room, I was ready to ditch the valances for something more neutral.  I looked everywhere for affordable curtains that were at least 108 inches long.  Many reviews of curtains I found at JC Penney or Bed Bath and Beyond were negative because the panels were actually different lengths than advertised, sometimes off by as much as two inches.  That wouldn't do when trying to dress three windows in a row!

I was ready to give up on buying ready-made curtains and submit to making my own, if I could find fabric that wouldn't break the bank.  Let's see...

Four (possibly six) 108 inch panels
$15 per yard for featured fabric (on sale)
That's at least $180 before 10% sales tax, plus I'd still need some sort of lining fabric.

We have a home decor fabric outlet in town, so I thought I'd check it out.  They have fabric for as little as $4/yard, but when it's gone, it's gone, so planning ahead is crucial when shopping there.  And that's where I found pre-made 100% linen panels.  They were perfect!

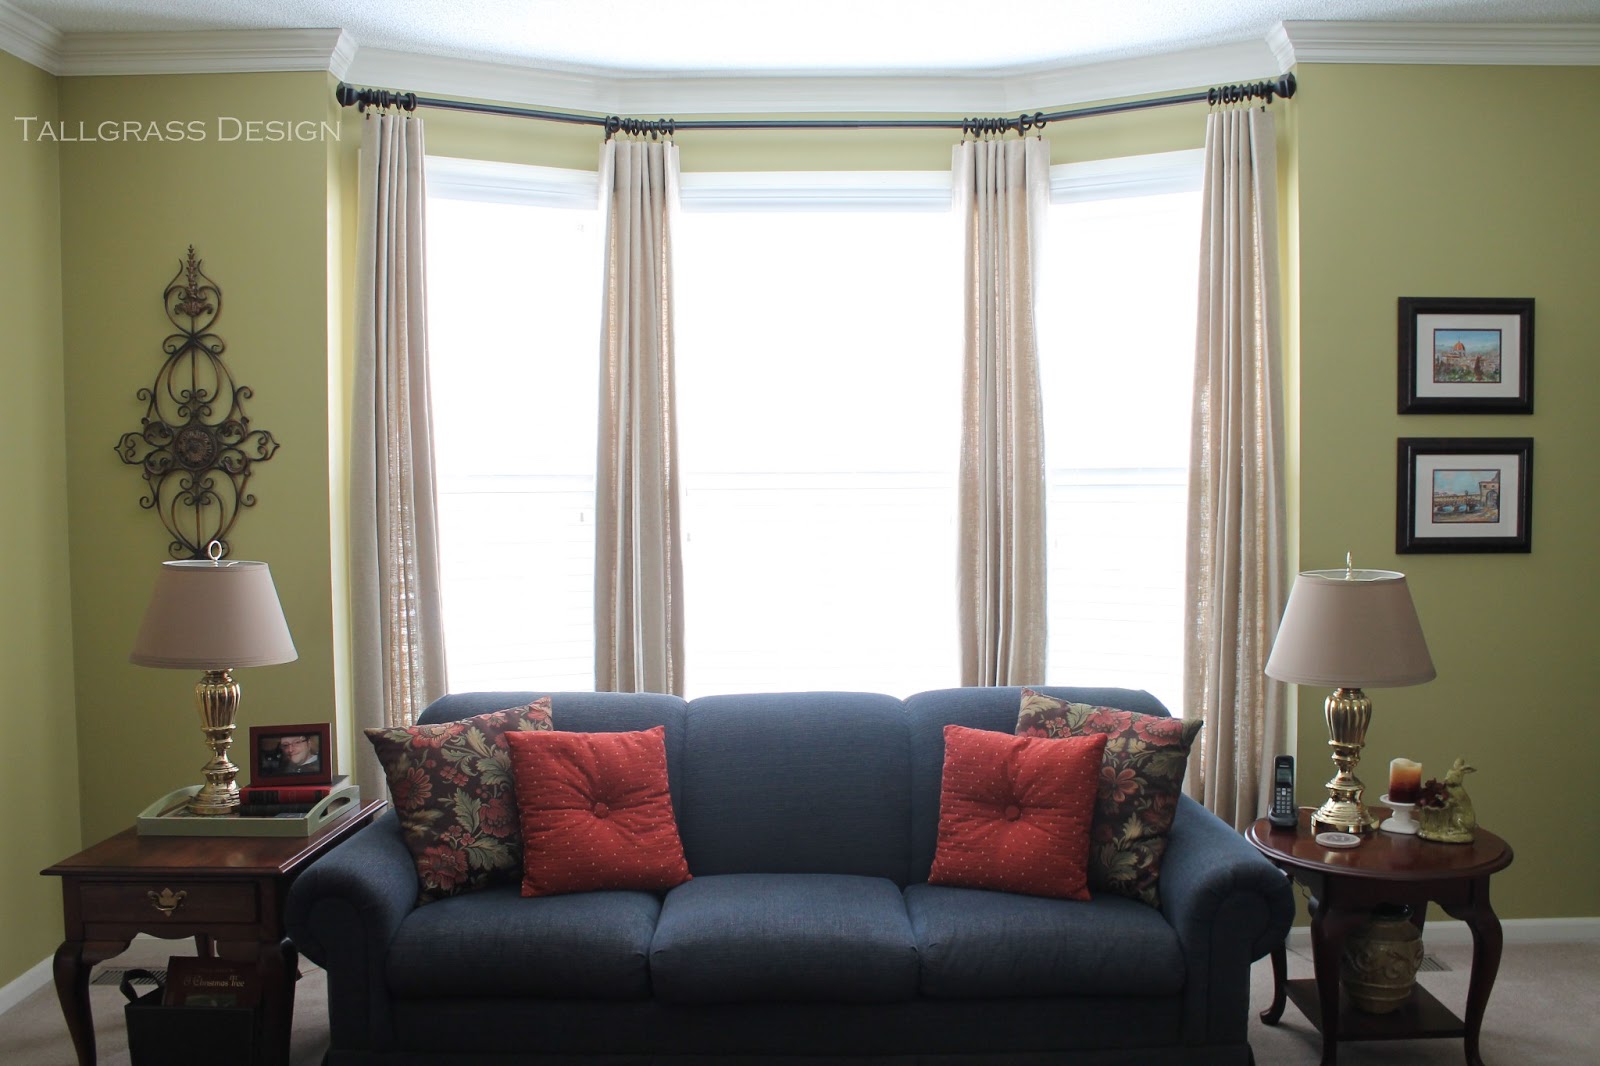
And the price?  $26 each for 120 inch panels.  A little hemming and a lot of ironing, and they were ready to hang.


I had to coach the pleats into shape for a couple of days.  Some strips of scrap fabric work well for this.  Just press the pleats with your fingers then hold them together with the strips tied every foot or so. After a couple of days, the pleats will stay in place on their own.  I love the neutral, classic look of these linen panels.


I'm linking up...
Between Naps on the Porch
Cedar Hill Ranch
Savvy Southern Style

Saturday, July 20, 2013

Lighten Up

Sorry for another disappearing act.  This summer hasn't turned out as I expected, and I've been pretty under the weather.  Being sick is never fun, but it always seems to be a little worse during the summertime.

We've managed a few un-blog-worthy projects around the house, like replacing a storm door that was literally crumbling to pieces and having gutter guards installed since the trees are now taller than the roof line (read: regularly clogged gutters).  The yard I worked so hard on this spring is now a weedy mess.  The laundry piled higher and higher, and when I was finally feeling well enough to tackle it, the washer broke.  Oh well.

During a good week, I decided I'd had enough of our dark olive green living room.  I had changed it from a ho-hum taupe about five years ago to SW Olive Grove and immediately regretted it.  It was just too dark.


Adding the overmantel helped lighten the room, but I still wanted a brighter, happier look.  I wanted to stick with a shade of green, and I finally settled on Valspar's Desert Grass that I had mixed at Sherwin Williams because I love their Cashmere paint.


It's a much more cheerful room, and the traditional cherry furniture I love seems less heavy now. This shade of green really blends well with the brass hardware, especially in the grandfather clock, my very first Craigslist purchase from about five years ago.  Can you believe I scored this beauty for only $125?  Since it had been stored in a dirty garage, I had it professionally cleaned, and the serviceman said it was worth about $800.  Score!


I've always been and admirer of secretary desks.  My grandmother and my great-grandmother had one, but I thought they were a little old-fashioned until I saw the many hutches and the secretary desk in Mary Carol Garrity's home:


So when I found a secretary that had just been put on the sales floor at ReStore, I pounced on it.  It's filled with beautiful books (that we've actually read, thank-you-very-much!) and favorite pictures documenting some of our family history.


It took five years, but I think I've finally figured out this room.

Monday, April 15, 2013

Overmantel Reveal

Hello again!  It's been a month since my last post.  Did you think I gave up blogging?  I've been working on a big project that consumed an entire month of evenings and weekends.

I've had crown moulding envy for a long time.

By the way, are you wondering if it's "moulding" or "molding"?  It depends if you are using British English or American English.  But like most things American, if we want to appear more upper crust, we resort to the British spelling.  So, I'm going to refer to it as "moulding."

After touring several new model homes, my husband was in agreement that adding crown moulding would make our house look less builder-basic.  While I was eager about adding crown moulding, I knew it was going to be a big project filled with challenges:

1. Our living room has bay windows.
2. There are two bump-ins flanking the foyer.  One is the coat closet ,and behind the other is the ductwork going to the second story which means lots of corners.
3. One wall is almost 20 feet long.  Another wall is about 16 feet long.

While researching installing crown moulding, I started to think about the mantel.  It's not a bad mantel, but wouldn't it be nice to beef it up a bit?  (Sorry for the nighttime photo). 


The first step was going to be to build a frame for the overmantel.  Fortunately, the existing columns were made of stock lumber.  Mitre saws don't bother me, but I am afraid of table saws.  I know someone who cut his finger off using a table saw, so I want nothing to do with them.

I used a 1x8 for the fronts and 1x3s for the two sides.  I like to prime and paint two coats before installing trimwork.  The final coat of paint I do at the end, and it's just to cover the nail holes and any scuff marks from installation.


After a test fit and making sure it was level, I drew a line on the wall as a guide.  I screwed scrap pieces of 2x4 into the top plate and into the existing mantel then nailed the frame into place.


I had a piece of hardboard cut at Home Depot for the backing, and from this point, it was all about adding trim.  Lots and lots of trim.  But it was so worth the time and living the with the dust and sawhorses because the room is completely transformed.  Notice the secretary desk which replaced the bookcase?  I found it at ReStore while I was in the final days of finishing the project.  It fits the space so much better.


Other than the crown moulding itself, which I bought at Lowes since it's closer to my house, most of the trim came from Home Depot since they sell it by the foot.  I did have to go to a lumberyard that caters to the pros to find the trim to match the the front of the existing columns.  Since our house is about 20 years old, I was concerned I wouldn't find a match.  Sometimes "builder-grade" isn't a bad thing!  Unfortunately, the existing artwork doesn't quite fit the space.  I'm not attached to it, so it will do for now.


I have a month of projects waiting to share.  It's so good to be back!


I'm linking up...
Between Naps on the Porch
Coastal Charm
Savvy Southern Style
Handy Man, Crafty Woman
The Shabby Creek Cottage
Chic on a Shoestring
The Shabby Nest
A Stroll Thru Life


Tuesday, February 19, 2013

Odds and Ends

My favorite part of shopping at ReStore is digging through boxes of odds and ends.  Recently, they received a donation of random curtain rod finials.  Some had partners, but most were missing their mates, like these two.


Immediately, I saw a use for them.  A little hot glue and some Rub 'n Buff was all they needed.


Isn't it pretty now?


Thursday, January 24, 2013

Color Correction

My husband is now fully on board with making some much needed updates to our home.  We're finally replacing the 90's builder-grade lighting, which means I've spent a lot of time on ladders.

We picked out a new light for the foyer from a big box store, but we didn't like the companion flush-mount light for the hall upstairs, so we went with another model from the same manufacturer since it had a similar, Tuscan-style finish.


Opening the first box, it seems the color of the trim was a lot lighter than what was depicted on the box.  It was more like an orange than a brown.  Hmmm...

Then I opened the second box.  Were my eyes playing tricks on me?  This was nothing like a Tuscan-brown.  It's yellow.  Can I live with it?  The answer was clearly going to be NO.


And at this point, I was frustrated.  I doubled-check the boxes to make sure they both the same finish.  They were, and the SKUs were identical.  I liked the style, but the color was all wrong.  So I did what any crafty DIY blogger would do.


Yes, I painted them with my favorite craft paint.


I'm happy with the end results.

I'm working on a big project this week that I can't wait to share, hopefully next week.

Saturday, January 5, 2013

Good Intentions, Project 1

One of my resolutions this year is to finish the projects that are really starting to collect.  I have a bad habit of finding all sorts of things that need TLC, but I never get around to them. One of my pals at ReStore calls these projects "good intentions."  She suspects I have a garage, basement, and car filled of "good intentions."  She's right, and that's going to change this year!

This weathered, crusty planter is an excellent example of a good intention:


I think I paid a quarter for it at ReStore last autumn.  After bringing it home, I gave it a good scrubbing and filled the cracks with Spackle.  I even took the "before" picture!  And then it sat on the floor of my basement studio, unfinished for months.

I finally got tired of stepping over it last week, and the dining room table was looking pretty bare after the holidays.  It was all the motivation I needed to finish it.

Too keep it from looking too flat, I painted it with a mixture of black and bronze craft paint and dry-brushed it.  It's finished with several coats of glossy acrylic sealer.


I used what I had on hand to fill it, focusing only on color and texture.  Never mind that a real hydrangea probably wouldn't be happy with a container with hens and chicks.  


I found the iced unripe pomegranates on clearance after Christmas.  I liked their color, so I tucked them in with the pine cones.


My favorite find last Christmas was these juniper picks I found at a local home decor store.  Since I usually shop the big chain craft stores with their sales and coupons, I hated paying full retail price for them.  But as the fake stuff goes, they were too lovely to pass up.


Good Intentions = 1.  One less unfinished, neglected item lurking in the basement.  What a great feeling!

Wednesday, December 19, 2012

Powder Room Reveal

I kid you not, as soon as I hit "post" on the ruffled tea towel mini-tutorial, my husband called up the stairs, "I see we now have a guest towel."

Uh-oh.

If you've been following me since the beginning, you may recall that I re-did our powder room a few years ago. It even was featured on Better After, and Lindsey mocked the sunflower border.  Here was the before-before.


Yikes! That was some really awful wallpaper!  It had to go, but I had a pretty small budget for a re-do.
 
I spray-painted the 90s light fixture ORB, switched the light shades to something more contemporary, and spruced up the dated oak mirror. The walls were painted SW Meditation, and it was supposed to be soothing, but with no windows, it was pretty dark in there.  Taking pictures with my trusty old point and shoot camera I was using back then didn't help matters either.
 

The moody blue was an improvement over all that green, but a couple of years later, I was getting restless.  And I kind of missed the green, just not that early 90s green.
 
It's a small space, a five-foot square with nine foot ceilings and no windows.  I felt I could afford to be a little bold with the wall color, so I tried SW Canary this time.
 
 
I scored a new mirror at ReStore, and glued scroll brackets that I stained to match the floating shelf over the toilet.  I think the brackets make the shelf look more substantial without adding too much heaviness.  The lantern is a Nell Hills find from months ago.  It was one of those things that I had to have, but then I didn't know what to do with it once I got it home.
 
 
This is a twenty-five square foot room with two doors since the laundry is just off the room.  Floor space is precious, but I found this darling étagère at Goodwill to tuck in the corner.
 
 
I repainted in August, but I decided to wait until Christmastime for the reveal.  It's just so cheerful in there now.  I love this darling miniature winking Santa mug.  He's so tiny that he gets lost in other rooms, but he fits right in here.
 
 
I think it qualifies as vintage since my grandmother painted it about 50 years ago.  She signed it, but it's not dated.  I should ask her if she remembers making it.
 
 
The ceramic pinch pot on the left isn't quite vintage yet.  I made it about 25 years ago when I was a kid in school.  Another quarter of a century won't make it as darling as little winky Santa!


I'm linking up...
 

Thursday, December 13, 2012

Put a Ruffle On It

I'm usually not the sort of person who would buy a guest towel.  My husband says, "You would never buy a guest wrench!  'Don't use that wrench!  That's the good wrench!'"

But I saw this tea towel at Hobby Lobby, and it was too cute to pass up.


As cute as it was, it was missing that little something extra, like a ruffle!

I cut a strip of fabric 8 inches wide and 36 inches long, folded it in half the long way, and stitched.  I turned it inside out and pressed it flat.

Next, I took a lot of pins and began creating the pleated ruffle with a lot of trial and error on the spacing.  "The King's Speech" is avaible for streaming on Netflix right now, so I pleated and pinned and re-pinned and re-pinned while watching Colin Firth.

Let me tell you, it's not a bad way to spend the evening!

When I was satisfied with the pleats, I stitched the ruffled to the towel, removing the pins as I sewed.  Don't stitch over the pins!


And the end results...


I'm linking up...
The Shabby Creek Cottage
At the Picket Fence
Funky Junk Interiors

Monday, October 1, 2012

Red Chippy Box

During this summer's drought, I only watered when absolutely necessary, so the garden is looking pretty shabby.  This winter I'm going to plan for an overhaul of half of the backyard next spring.

In the meantime, I've been slowing cleaning out the garden, and I decided this planter box has seen its better days.


I built it about 11 years ago out of scraps from a deck and fence project.  I really didn't have any sort of plan when I built it, so I'm pretty amazed it held together for so long.

I unscrewed the side panels, trimmed the weathered ends and built a little box.  On a whim, I added the little feet.  Aren't they cute?

 
I used a palm sander and a Dremel to wear down all the edges.  Originally, I was going to leave it natural, but the wood was so bowed from being outside, I had to use a lot of wood putty to fill the joints.  Now, I'm so glad I painted it.
 
 
It took the better part of an afternoon to get the effect I wanted.  It was worth the time spent!
 

So how did I get the look?  Chalk paint?  Milk paint?

Nope.  It's all just typical craft store stuff!


Start with a brown acrylic craft paint for the base coat.  Follow with black acrylic craft paint for the second coat.  I think starting with brown keeps the black from seeming too stark when the layers are sanded away.

Next, apply one coat of Weathered Wood Crackle Medium (follow the directions on the package).  Top coat of Cadmium Red acrylic craft paint.

Sand, sand, sand.  Complete with Minwax Paste Finishing Wax.


I can't describe how amazingly soft the wood feels.  The wax really makes the box feel old.

Then again, I used 11+ year old wood to build it.  Let's see those feet one more time.


I'm linking up...

Tuesday, August 21, 2012

Mini-Bar Knock-off

In my part of the country, finished basements are pretty typical.  Some are really tricked out with elaborate wet bars, and I really question how much use they get.

When I've toured Mary Carol Garrity's home, one of the things I've admired is her mini-bar which moves from room to room, depending on the season.  I've seen it set up in her foyer ready to serve guests at a holiday party or tucked aside in the living room.


While I try to keep the liquor put away, it always seems like the old stand-bys don't stay in the cabinet.  I had a spare corner in the dining room that would be perfect for a small cart or table, if I could find one.

I searched my favorite thrift stores and second-hand shops until I found this table at a local antique store.


Being a reproduction, not an actual antique, the price was right.  I didn't like the backing or the spindles, but they were easy to remove.  The shelves were wood veneer, but I figured it could strip it and restain it.

And that's where my troubles started.

First problem: The original stain was stubborn, especially on the legs.  The stripper was pretty ineffective, so I had to sand the majority of the legs.

Second problem:  I couldn't get the new stain to "take."  I wanted it to be a dark cherry color.  I applied one coat of Minwax Red Mahogany.  Then a second coat. Still too pale.  So I switched to Ebony.  (Thank goodness I had all this stain on hand already).  Closer, but not quite.  The grain was disappearing and it looked muddy.  At this point, I'm ready to ditch the stain and head for the spray paint.

Good thing I didn't give up.


How did I achieve that rich finish?  I wiped down the excess stain with mineral spirits and tried one more thing: a wash with burnt sienna acrylic craft paint with just a dab of black paint. Brushed it on a small section with a chip brush, then promptly wiped the excess.  Let it dry, then sealed with Minwax's Wipe-on Poly.

Perfect!


I know that distressed chalk paint is all the rage...to the point of being passé in my opinion.  Give me that subtle shading of stained wood any day.


Shhhh...the lamp came from our neighbor's trash.  Formerly shiny brass, I spray painted it ORB.  I think their daughter recognized it when I was painting it in our driveway.  Yes, that was a little embarrassing.  The lampshade was a ReStore find last week.

Cocktail, anyone?


And my most recent Nell Hill's purchases: This little fern plant and decanter.


For all the hours I spent trying to get the finish right, I'm so glad I didn't give up on it.


I'm linking up...