Monday, August 27, 2012

Pair of Pears

A couple of years ago, I started dabbling in painting.  I claim to be no artist.  While I took art classes when I was in school, they were usually for drawing or ceramics.  I am a 100% self-taught painter.


I like painting abstract landscapes.  And pears.  With a palate knife.  No brushes involved.  I painted the whole thing with this:


Why are pears such a common subject?  There must be something about those curves.

I used a 12 x 12 wrapped canvas, so I could have skipped the framing, but my decorating style is pretty traditional so a frame was more appropriate.  While I was pleased how this painting turned out, I didn't want to splurge on custom framing.

So I started with basic wood frame from Michaels (plus a 40% off coupon).


It's a shallow frame so the canvas would stick out the back, so I added some bulk on the backside with some 1x2 I had on hand.  I used wood glue and small brads to attach the four pieces to the main frame.


Next, a little sanding and a bit of wood putty to fill the gaps, followed by two coats of my favorite craft paint.


I had painted the hall to the garage red last year.  I love the color, but it's a little dark.  I love the way the green pears pop against the wall now.


I'm linking up...
 

Tuesday, August 21, 2012

Mini-Bar Knock-off

In my part of the country, finished basements are pretty typical.  Some are really tricked out with elaborate wet bars, and I really question how much use they get.

When I've toured Mary Carol Garrity's home, one of the things I've admired is her mini-bar which moves from room to room, depending on the season.  I've seen it set up in her foyer ready to serve guests at a holiday party or tucked aside in the living room.


While I try to keep the liquor put away, it always seems like the old stand-bys don't stay in the cabinet.  I had a spare corner in the dining room that would be perfect for a small cart or table, if I could find one.

I searched my favorite thrift stores and second-hand shops until I found this table at a local antique store.


Being a reproduction, not an actual antique, the price was right.  I didn't like the backing or the spindles, but they were easy to remove.  The shelves were wood veneer, but I figured it could strip it and restain it.

And that's where my troubles started.

First problem: The original stain was stubborn, especially on the legs.  The stripper was pretty ineffective, so I had to sand the majority of the legs.

Second problem:  I couldn't get the new stain to "take."  I wanted it to be a dark cherry color.  I applied one coat of Minwax Red Mahogany.  Then a second coat. Still too pale.  So I switched to Ebony.  (Thank goodness I had all this stain on hand already).  Closer, but not quite.  The grain was disappearing and it looked muddy.  At this point, I'm ready to ditch the stain and head for the spray paint.

Good thing I didn't give up.


How did I achieve that rich finish?  I wiped down the excess stain with mineral spirits and tried one more thing: a wash with burnt sienna acrylic craft paint with just a dab of black paint. Brushed it on a small section with a chip brush, then promptly wiped the excess.  Let it dry, then sealed with Minwax's Wipe-on Poly.

Perfect!


I know that distressed chalk paint is all the rage...to the point of being passé in my opinion.  Give me that subtle shading of stained wood any day.


Shhhh...the lamp came from our neighbor's trash.  Formerly shiny brass, I spray painted it ORB.  I think their daughter recognized it when I was painting it in our driveway.  Yes, that was a little embarrassing.  The lampshade was a ReStore find last week.

Cocktail, anyone?


And my most recent Nell Hill's purchases: This little fern plant and decanter.


For all the hours I spent trying to get the finish right, I'm so glad I didn't give up on it.


I'm linking up...
 

Saturday, August 11, 2012

Chaos

I dream of being featured in a craft magazine. Somehow, I don't think that's going to happen.


I've been working on a lot of small, diverse projects, which means the studio is a complete mess.


Try as I might, I can't seem to keep the table clear.  Receipts.  Fabric scraps. Embroidery floss. Paint.  Jars of Mod Podge.  More paint.  One finished project peeking out, waiting to be hung.


Fabric for a partially completed quilt. Burlap scraps.  Packaging tape.  Bits of ribbon.


Here is Where This Woman Creates.

Thursday, July 19, 2012

Jute Hugging Curves

Summer, you have worn out your welcome this year.  It's just too darn hot and dry.

I'm retreating from the outdoors, which means I've been finally addressing some of the household chores that I ignored this spring, like hauling the glass to the community recycling area.

I'm pitching glass into the bin, when I notice that some of these bottles are pretty substantial.  And some have a great shape.  I'm seeing subtle colors.  Curves.  And jute.

And something my hands can work on while my husband and I watch his favorite cooking shows.  In the basement.

The cool basement.  And think of cool water, the color of this blue glass.


While everything outside is turning brown, I'll remember the greens.


I think the bottoms are my favorite part.

Both are available for sale in my Etsy shop.

Monday, July 9, 2012

Pineapple Lamp Love

Recently, I was a stalker.

A thrift store stalker.  Someone found some vintage watercolor prints before I did.  She called over her companion for a look.  She held one up, "Look, they are scenes from Rome!"

They were in a stack on the floor, and I had walked right by them.  Dang it!  I pretended to be interested in nearby shelf of candlestick holders, stealing glances over shoulders.  Hoping she might change her mind.  And ready to pounce if she walked away from them.

Win some, lose some.  More often than not, I'm hauling something to the cashier, and I can see it in everyone's faces...

"What is she going to do with THAT?"

Like this pineapple lamp I found at a vintage market.  Love at first sight!  It was a busy afternoon, and the store was filled with people.  I couldn't believe it was still there!


The lamp shade wasn't included, but I had the perfect black shade at home.  The price is right.  It was meant to be!

I think it originally had dangles from its leaves.  No matter, it looks much better without them.  Check out the patina.


Forget about those predictable three-matching-lamps-in-a-box found at the usual shopping center home stores. 

Vintage-glam-oversized pineapple lamp, you will be mine!

Monday, July 2, 2012

Repurposed Garden Orb

Hot.

Hot.

Hot.

That's all I have to say today.

Just kidding.  I've spent hours working in the garden.  Planning, planting, dreaming.  Now everything is wilting.  I did some pretty zealous weeding last weekend and discovered the next day that there is poison ivy or poison oak lurking somewhere in my backyard that I overlooked.  It made its way into my garden gloves.  Oddly, it doesn't itch too badly, but with my skin type, it's going to leave a nasty scar on the back of my hand.  There goes my dreams of being a hand model.

In my early gardening days, I loved hanging baskets.  I still do, but I don't even try them anymore.  Everything in them seem to wither in the hot Kansas winds.  Years ago, I tossed the coconut liners and abandoned the wire baskets on the top shelf of the garage.


I've seen several DIY orbs in blogland this summer, like this orb chandelier from Ballard Designs.   I love the shape, but I think these sort of lights throw off weird shadows.  Then a few weekends ago, I was doing a garage sale drive-by.  Is it worth getting out of my air-conditioned car?  I thought I saw something, a sundial or a ornamental orb for the garden?  I turned around for another look and realized it was just a stack of hanging baskets. 

But it got me thinking...I could take those old wire baskets in my garage, put two of them together with four black zip-ties, and I'd have a nice little orb.  I found an old curtain rod and finials at ReStore and made a trip to the hardware store for oversized washers to hold the whole thing together.  The washers received a quick blast of black spray paint.


Originally, I was going to use hot glue to hold the washers, but that wasn't working.  So I used black thread to keep the washers in place for the final assembly.  If I had four hands, I probably wouldn't have needed it because ultimately, the wire basket is squeezed between two washers, one on the inside and one on the outside of the sphere.  I rested one more washer at the bottom, just to add a more finished look.


I have two more hanging baskets in the garage and the other finial to make another orb, maybe when it cools down a little, like October.


I'm linking up...

Monday, June 25, 2012

Garden Statuary

Since I'm running out of room for new plants, this year I decided to focus more on decor and hardscaping.  Well, at least planning for future hardscaping.

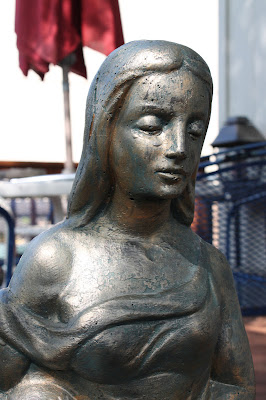
I found this statue at a thrift store last spring.  She's about three feet tall and was covered in green and gold paint.  Yikes!


Inspired by classic bronze statues, I toned down that gold paint with oil rubbed bronze spray paint, then dry brushed her with two shades of craft paint.  Then she was sealed with multiple coats of clear sealer.


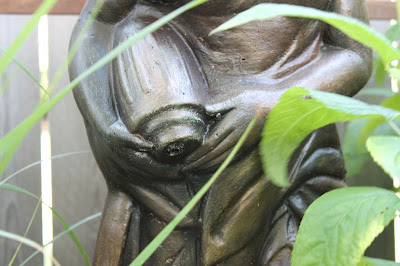
With less gold and more bronze, she's a lovely addition to the garden.  Check out that curve of her right shoulder!


I think she might have originally been a fountain.


For now, she's nestled between the feather reed grass and the salvia.