Thursday, July 29, 2010

Sweet Harmony

Since summer is over half over, I decided it was time to put away my heavy black leather handbag for a few weeks.  And my sewing machine has been feeling neglected lately.  Enter Amy Butler.


I love Amy Butler.  I love her style.  I love the blend of Midwest sensibility and a riot of color.

Psychedelic, I'd like you to meet Psychotropic.

*** 
First things first: I am a NOVICE seamstress.  I know my limitations.  Right?

Let's try this again. (Ahem.)  I KNOW MY SEWING LIMITATIONS.

Before I left the store, I read skimmed the directions.  Then decided I better not splurge for actual Amy Butler fabric.  And I opted to go down the street to Hobby Lobby for the lining fabric.  See, I TOLD you I know my limitations.

Actually, Amy's patterns aren't too bad.  If you read them carefully.  And I am BFF with my seam ripper.  The pattern comes in two sizes, the tote and the handbag.  I made the handbag.


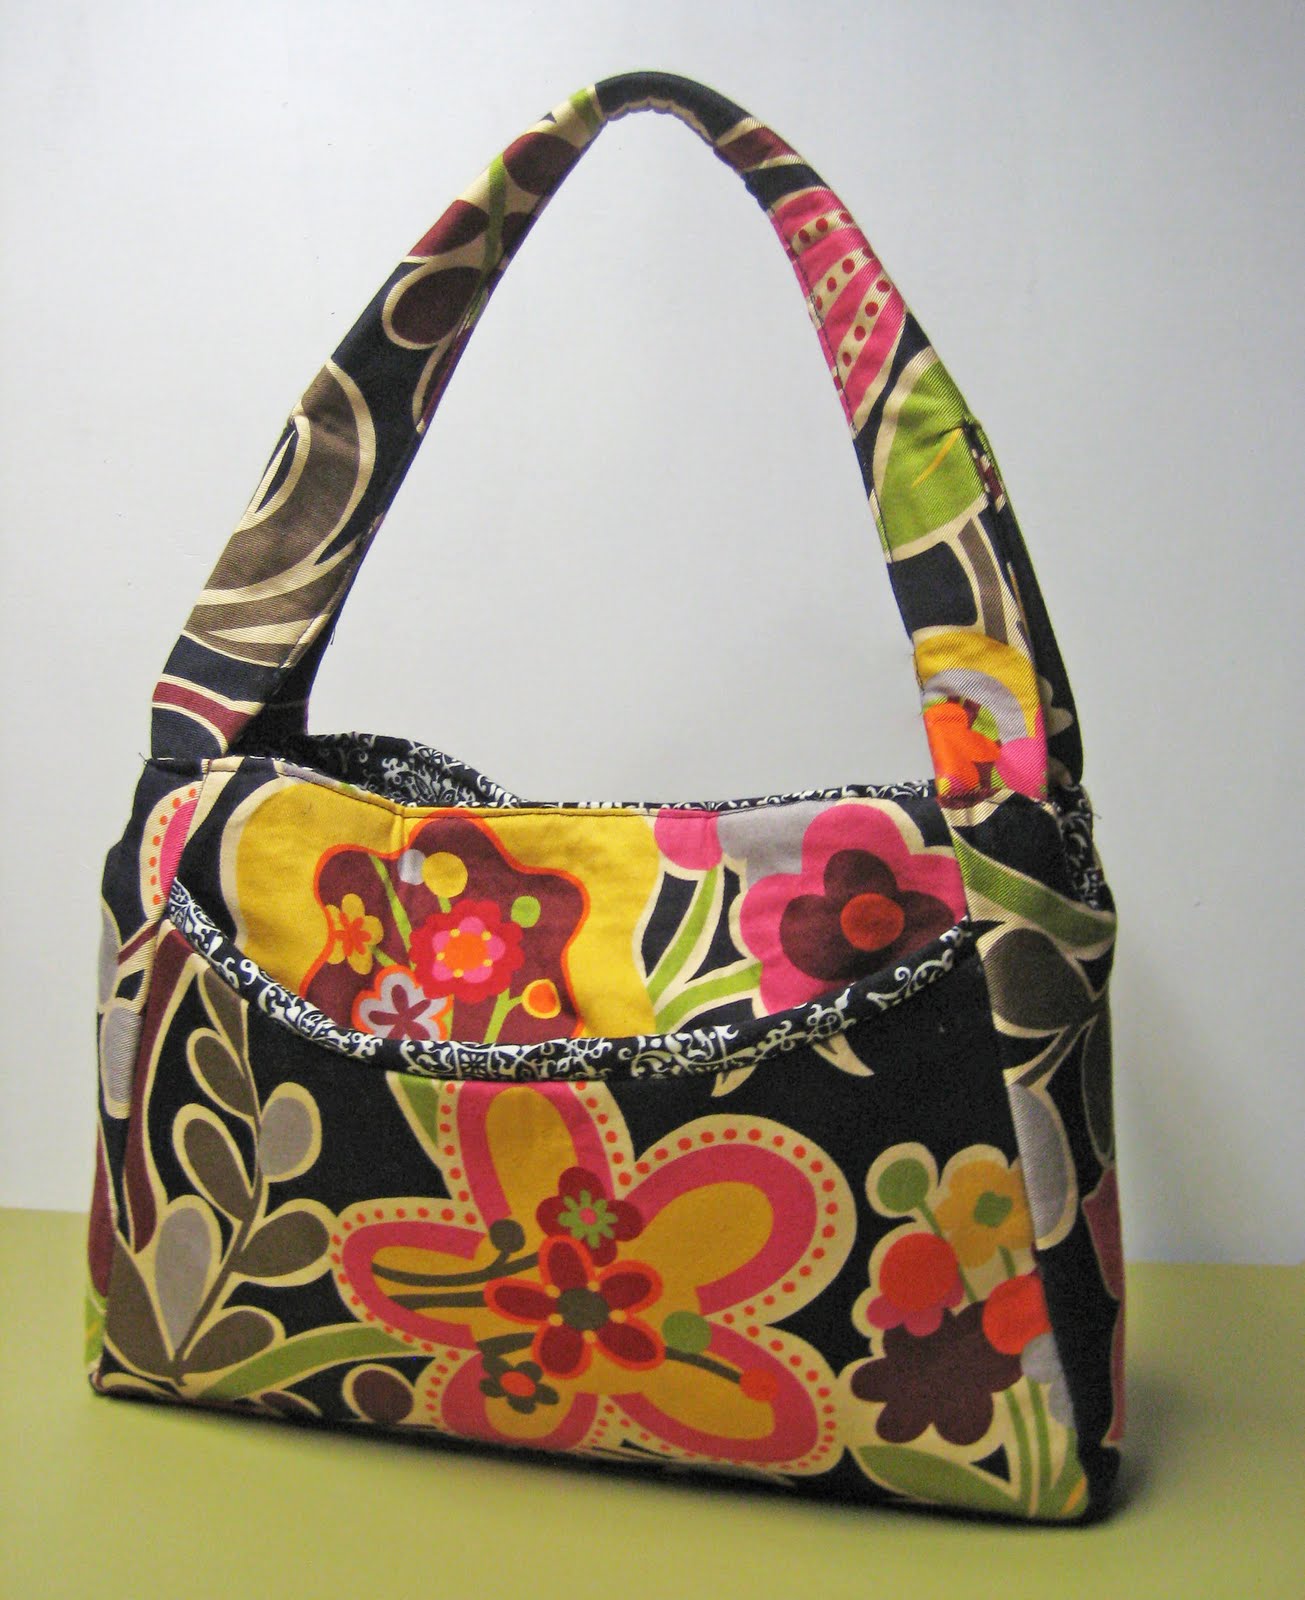
Isn't she a beauty!  And she features plenty of pockets, like this cutie for a cell phone:


There is an option for one or two interior zipper pockets, but zippers don't play nice with me.  So I opted for the simpler interior pockets, which gives me a nice place to tuck away my lip gloss, iPod and a tape measure.  You know, the essential stuff.


Since I'm still a sewing rookie, I just have a trusty late model Singer sewing machine.  Nothing fancy.  And it did manage to stitch through the layers of interfacing, fleece and fabric.  The only time I began to sweat was the final assembly of the side panels.  See that tight little "U"?  By the time I contorted myself and the bag around the machine, I could only see the needle with one eye.


I modeled my new bag for Mr. Tallgrass.  He asked how many purses could be made in China in the amount of time it took me to make one.  Then he asked how much it cost.

Pbbst!

Thursday, July 22, 2010

Thinking Outside the Box

I came into this wooden craft box, which had been painted with tulips.  Not really my style.  Or anyone's style.  But I'm sure the intentions were good.


I couldn't bear to just toss it.  So it went into my junk room studio along with all the other unfinished potental projects.

I recently built super skinny console table for the hall upstairs, but I felt like it needed something besides a lamp and a couple of photos.  My thoughts turned back to this box.  I had some 1" wooden half-spheres from another project (more about that project to come) and I thought about gluing one on the lid to give it a little more umph, but it just didn't have the glam that I was seeking.

During my message board project, I looked at a lot great cabinet door pulls.  Ceramic.  Glass.  Novelty.  Oh, my!

But first, let's address the sad paint job.  I sanded the thick layer of tulips from the box.  Then, brought out the reinforcement:


Turquoise blue is such a great color right now, but I'm still detoxing my house from the mid-90s.  So I went with "Victoria Blue" from my stash for the base layer.  Let it dry.  Then, dry brush the surface with black craft paint.  Allow to dry to the touch.   Lightly dry-brush a layer of the Victoria Blue to "knock down" some of the blackness.  After drying overnight, I coated everything with Mod Podge.

Originally, I wanted a red glass flower pull for the lid.  I thought I had seen one somewhere.  Alas, I must have imagined it.  Hobby Lobby has a great selection of glass and ceramic cabinet pulls and they are marked 50% off regularly.  Drill a hole in the lid.  Since we're not talking about fine wood, I'd recommend starting with a small drill bit to drill a pilot hole, then work your way up to bit large enough to make a hole to accommodate the screw.  This should help prevent the wood from splitting.

End result:


Final cost to spruce up this little box?  $2.50.  Amazing what a little paint can un-do.
And it's been a rough week at work.  The project was cheaper than therapy. 

What little treasures shall we stash in it?

Thursday, July 15, 2010

Fortune Cookie

Another insanely busy day at work.  A couple of the managers brought in Chinese food for lunch.

I pulled this out of my fortune cookie:

Wonder which one of my schemes I should be modifying?

Saturday, July 10, 2010

Re-Purposed Message Board


Our local Habitat Re-Store (sales benefit Habitat for Humanity) recently celebrated its anniversary with a 25% off sale. I drooled over the great prices on the pallets of tile, but alas, we're not ready to tackle a tile project yet. Then, I found the racks of cabinet doors. And I'm seeing Message Boards. Someone get me a shopping cart!


I picked through the racks of old doors, searching for large doors that had a framed trim, like this one:


There were already two holes drilled in the door from the old cabinet pull. I drilled a third hole and gave the entire door a light sanding. Always take care when sanding or removing paint from objects that might contain lead based paint. Since I was planning on lightly distressing the finish, I skipped the primer and went straight for the spray paint.

Confession Number One: I love paint. If it doesn't move in our house, I might paint it.


What a handsome couple!


The frame received three light coats of spray paint, then the entire surface was lightly sanded with fine grit sandpaper and finished with extra fine steel wool.


Since the distressing left the gloss of the spray paint uneven, I used a wipe-on poly over the previously painted surface.


I carefully brushed chalkboard paint on the center section, using an angled artist's brush for the corners.


Portrait of a Paint Brush


The "hooks" are cabinet door pulls from Target. After installing two saw-toothed hangers and a pair of bumpers on the back side I had a one of a kind message board, perfect for organizing keys and the dog's leashes.


There never seems to be enough hours in the day!

Welcome!

Welcome to Tallgrass Design! After hours of scheming and dreaming, I finally decided to toss away the book and dive into blogging. I'm sure I'll make plenty of mistakes, but thank you for joining me on my journey. I hope this can be a place of inspiration for you as so many of my blogging predecessors have been for me.
"Dreams are the touchstone of our character."
Henry David Thoreau